Dependency Injection with Dagger 2

Dependency Injection with Dagger 2

原文:Dependency Injection with Dagger 2

创建单例

下面展示一个简单的Dagger来管理所有单例创建的例子:

1
2
3
4
5
6
7
8
9
10
11
12
13
14
15
16
17
18
19
20
OkHttpClient client = new OkHttpClient();

// Enable caching for OkHttp
int cacheSize = 10 * 1024 * 1024; // 10 MiB
Cache cache = new Cache(getApplication().getCacheDir(), cacheSize);
client.setCache(cache);

// Used for caching authentication tokens
SharedPreferences sharedPreferences = PreferenceManager.getDefaultSharedPreferences(this);

// Instantiate Gson
Gson gson = new GsonBuilder().create();
GsonConverterFactory converterFactory = GsonConverterFactory.create(gson);

// Build Retrofit
Retrofit retrofit = new Retrofit.Builder()
.baseUrl("https://api.github.com")
.addConverterFactory(converterFactory)
.client(client) // custom client
.build();

声明你的单例

我们需要一个和 Application 生命周期绑定的用来提供给 Activity 和 Fragment 的 Retrofit 。

因为我们希望使用缓存,所以需要一个 Application context。首先新建 AppModule.java 模块来提供这个引用。我们将定义一个使用 @Provides 注释的方法,来使 Dagger 知道该方法是 Application 返回类型的构造函数。

1
2
3
4
5
6
7
8
9
10
11
12
13
14
15
@Module
public class AppModule {

Application mApplication;

public AppModule(Application application) {
mApplication = application;
}

@Provides
@Singleton
Application providesApplication() {
return mApplication;
}
}

我们创建了一个名为 NetModule.java 的类,并使用 @Module 对其进行注释,以便向 Dagger 发出信号,以便在可用的方法中搜索可能的实例提供程序。

实际上返回公共可用类型的方法也应该使用 @Provides 注释进行注释。@Singleton 注释还向 Dagger 编译器发出信号,表明该实例应该只在应用程序中创建一次。In the following example, we are specifying SharedPreferences, Gson, Cache, OkHttpClient, and Retrofit as the return types that can be used as part of the dependency list.

1
2
3
4
5
6
7
8
9
10
11
12
13
14
15
16
17
18
19
20
21
22
23
24
25
26
27
28
29
30
31
32
33
34
35
36
37
38
39
40
41
42
43
44
45
46
47
48
49
50
51
52
53
@Module
public class NetModule {

String mBaseUrl;

// Constructor needs one parameter to instantiate.
public NetModule(String baseUrl) {
this.mBaseUrl = baseUrl;
}

// Dagger will only look for methods annotated with @Provides
@Provides
@Singleton
// Application reference must come from AppModule.class
SharedPreferences providesSharedPreferences(Application application) {
return PreferenceManager.getDefaultSharedPreferences(application);
}

@Provides
@Singleton
Cache provideOkHttpCache(Application application) {
int cacheSize = 10 * 1024 * 1024; // 10 MiB
Cache cache = new Cache(application.getCacheDir(), cacheSize);
return cache;
}

@Provides
@Singleton
Gson provideGson() {
GsonBuilder gsonBuilder = new GsonBuilder();
gsonBuilder.setFieldNamingPolicy(FieldNamingPolicy.LOWER_CASE_WITH_UNDERSCORES);
return gsonBuilder.create();
}

@Provides
@Singleton
OkHttpClient provideOkHttpClient(Cache cache) {
OkHttpClient.Builder client = new OkHttpClient.Builder();
client.cache(cache);
return client.build();
}

@Provides
@Singleton
Retrofit provideRetrofit(Gson gson, OkHttpClient okHttpClient) {
Retrofit retrofit = new Retrofit.Builder()
.addConverterFactory(GsonConverterFactory.create(gson))
.baseUrl(mBaseUrl)
.client(okHttpClient)
.build();
return retrofit;
}
}

注意方法可以随意命名。使用 @Provides 注释的方法的返回类型将用于此实例化与任何其他相同类型的模块相关联。@Singleton 注释用于声明 Dagger 仅在应用程序的整个生命周期中初始化一次。

定义注解目标

Dagger 为您的 activities, fragments, services 中的 field 提供了一种方法,只需通过使用 @Inject 批注注释字段并调用inject() 方法即可为其分配引用。调用 inject() 将使 Dagger2 在依赖表中找到对应返回类型的单例。如果找到一个,它会将引用分配给相应的字段。例如,在下面的示例中,它将尝试查找返回 MyTwitterApiClient 和 SharedPreferences 类型的提供者。

1
2
3
4
5
6
7
8
9
10
11
public class MainActivity extends Activity {
@Inject
MyTwitterApiClient mTwitterApiClient;
@Inject
SharedPreferences sharedPreferences;

public void onCreate(Bundle savedInstance) {
// assign singleton instances to fields
InjectorClass.inject(this);
}
}

Dagger 2中使用的注入器类称为 component。它在我们的 activities, fragments, services 中分配引用,以访问我们之前定义的单例。我们需要用 @Component 来注解该类。注意,允许请求模块声明的依赖项的 activities, fragments, services (通过 @Inject 注解)应该在此类中使用单独的i nject() 方法声明:

1
2
3
4
5
6
7
@Singleton
@Component(modules={AppModule.class, NetModule.class})
public interface AppComponent {
void inject(MainActivity activity);
// void inject(MyFragment fragment);
// void inject(MyService service);
}

请注意,基类不能作为注入目标。Dagger 2 依赖于强类型类,因此必须明确指定应定义哪些类。

生成代码

Dagger 2 的一个重要方面是该库为使用 @Component 接口注释的类生成代码。您可以使用以 Dagger 为前缀的类(即DaggerTwitterApiComponent.java),该类将负责实例化我们的依赖关系图的实例,并使用它来为使用@Inject注释的字段执行注入工作。

实例化 Component

我们应该在 Application 类的初试化中完成所有这些工作,因为这些实例应该在应用程序的整个生命周期中只声明一次:

1
2
3
4
5
6
7
8
9
10
11
12
13
14
15
16
17
18
19
20
21
22
23
24
public class MyApp extends Application {

private AppComponent mAppComponent;

@Override
public void onCreate() {
super.onCreate();

// Dagger%COMPONENT_NAME%
mAppComponent = DaggerAppComponent.builder()
// list of modules that are part of this component need to be created here too
.appModule(new AppModule(this)) // This also corresponds to the name of your module: %component_name%Module
.netModule(new NetModule("https://api.github.com"))
.build();

// If a Dagger 2 component does not have any constructor arguments for any of its modules,
// then we can use .create() as a shortcut instead:
// mAppComponent = com.codepath.dagger.components.DaggerAppComponent.create();
}

public AppComponent getAppComponent() {
return mAppComponent;
}
}

在我们的 Activity 中,我们只需要访问这些 Component 并调用 inject()。

1
2
3
4
5
6
7
8
9
10
public class MyActivity extends Activity {
@Inject OkHttpClient mOkHttpClient;
@Inject SharedPreferences sharedPreferences;

public void onCreate(Bundle savedInstance) {
// assign singleton instances to fields
// We need to cast to `MyApp` in order to get the right method
((MyApp) getApplication()).getAppComponent().inject(this);
}
}

Qualified types(限定值类型)

如果我们需要一种返回类型的不同对象,我们可以使用 @Named 限定符注解。需要在提供单例(@Provides注释)的位置以及注入它们的位置(@Inject注释)中定义它:

1
2
3
4
5
6
7
8
9
10
11
12
13
14
15
16
@Provides 
@Named("cached")
@Singleton
OkHttpClient provideOkHttpClient(Cache cache) {
OkHttpClient client = new OkHttpClient();
client.setCache(cache);
return client;
}

@Provides
@Named("non_cached")
@Singleton
OkHttpClient provideOkHttpClient() {
OkHttpClient client = new OkHttpClient();
return client;
}
1
2
3
4
5
6
7
@Inject 
@Named("cached")
OkHttpClient client;

@Inject
@Named("non_cached")
OkHttpClient client2;

@Named 是 Dagger 预定义的限定符,但是你也可以创建你自己的限定符注解:

1
2
3
4
5
@Qualifier
@Documented
@Retention(RUNTIME)
public @interface DefaultPreferences {
}

Scopes(作用域)

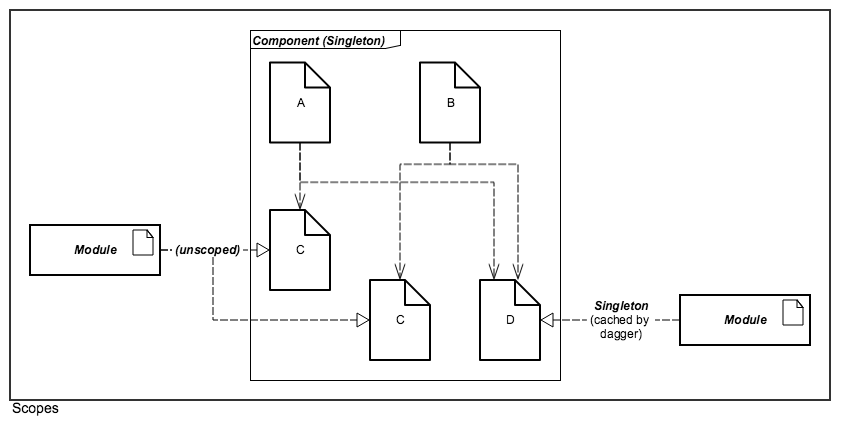
在Dagger 2中,您可以通过定义自定义 scopes 来定义组件应如何封装。例如,您可以创建仅存在于 Activity、Fragment 生命周期持续时间的范围。您可以创建仅映射到用户身份验证会话的范围。您可以通过将它们声明为公共 @interface 来定义程序中的任意数量的自定义范围注释。

1
2
3
4
5
@Scope
@Documented
@Retention(value=RetentionPolicy.RUNTIME)
public @interface MyActivityScope{
}

即使 Dagger 2 在运行时不依赖于注解,将 RetentionPolicy 保留在RUNTIME在让您以后检查 Module 时也很有用。

Dependent Components vs. Subcomponents

利用 scopes 允许我们创建 dependent componentssubcomponents。上面的例子表明我们使用了持续应用程序整个生命周期的 @Singleton 注释。我们还依赖于一个主要的 Dagger 组件。

如果我们不希望有多个组件一直保留在内存中(即与 Activity 或 Fragment 的生命周期相关联的 component ,甚至与用户登录时绑定的 component ),我们可以创建 dependent componentssubcomponents。在任何一种情况下,每种方法都提供了一种封装代码的方法。我们将在下一节中看到如何使用它们。

使用这些方法时有几个注意事项:

  • Dependent components 要求父组件明确列出可以向下游注入的依赖项,而 subcomponents 则不需要。对于父 components,您需要通过指定类型和方法来向下游组件公开:

    1
    2
    3
    4
    5
    6
    7
    8
    9
    10
    11
    12
    // parent component
    @Singleton
    @Component(modules={AppModule.class, NetModule.class})
    public interface AppComponent {
    // remove injection methods if downstream modules will perform injection

    // downstream components need these exposed
    // the method name does not matter, only the return type
    Retrofit retrofit();
    OkHttpClient okHttpClient();
    SharedPreferences sharedPreferences();
    }

    如果您忘记添加此行,您可能会看到有关缺少注射目标的错误。与私有/公共变量的管理方式类似,使用父 components 允许更明确的控制和更好的封装,但使用子组件使得依赖注入更容易管理,代价是更少的封装。

  • 两个 dependent components 不能共享同一个 scope。例如,两个组件不能同时作为 @Singleton 作用域(原因)。dependent components 需要定义自己的 scope。

  • 虽然 Dagger 2 还支持创建范围实例的功能,但您有责任创建和删除与预期行为一致的引用。Dagger 2对底层实现一无所知。(更多细节)。

Dependent Components

例如,如果我们希望使用为签署到应用程序的用户会话的整个生命周期创建的组件,我们可以定义自己的 UserScope 接口:

1
2
3
@Scope
public @interface UserScope {
}

接下来我们定义父 component:

1
2
3
4
5
6
7
@Singleton
@Component(modules={AppModule.class, NetModule.class})
public interface AppComponent {
// downstream components need these exposed with the return type
// method name does not really matter
Retrofit retrofit();
}

然后我们定义子component:

1
2
3
4
5
@UserScope // using the previously defined scope, note that @Singleton will not work
@Component(dependencies = AppComponent.class, modules = GitHubModule.class)
public interface UserComponent {
void inject(MainActivity activity);
}

我们假设这个 GitHub 模块只返回一个 API 接口到 GitHub API:

1
2
3
4
5
6
7
8
9
10
11
12
13
14
@Module
public class GitHubModule {

public interface GitHubApiInterface {
@GET("/org/{orgName}/repos")
Call<List<Repository>> getRepository(@Path("orgName") String orgName);
}

@Provides
@UserScope // needs to be consistent with the component scope
public GitHubApiInterface providesGitHubInterface(Retrofit retrofit) {
return retrofit.create(GitHubApiInterface.class);
}
}

为了使 GitHubModule.java 能够访问 Retrofit 实例,我们需要在上游组件中明确定义它们。 如果下游模块将执行注入,它们也应该从上游组件中移除:

1
2
3
4
5
6
7
8
9
10
@Singleton
@Component(modules={AppModule.class, NetModule.class})
public interface AppComponent {
// remove injection methods if downstream modules will perform injection

// downstream components need these exposed
Retrofit retrofit();
OkHttpClient okHttpClient();
SharedPreferences sharedPreferences();
}

最后一步是使用 UserComponent 来执行实例化。这次,我们首先需要构建 AppComponent 并将其传递给 DaggerUserComponent 构建器的构造函数:

1
2
3
4
5
6
7
8
9
AppComponent mAppComponent = DaggerAppComponent.builder()
.appModule(new AppModule(this))
.netModule(new NetModule("https://api.github.com"))
.build();

UserComponent userComponent = DaggerUserComponent.builder()
.appComponent(mAppComponent)
.gitHubModule(new GitHubModule()) // this is optional
.build();

Subcomponents

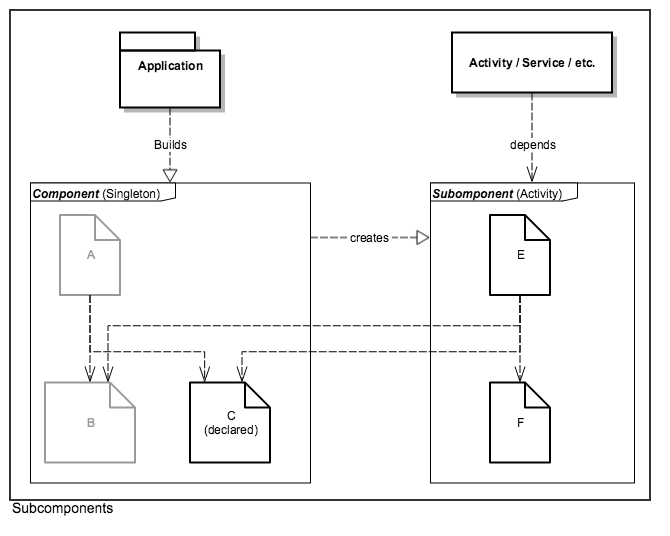
使用 subcomponents 是扩展 component 对象图的另一种方法。与具有依赖关系的 components 一样,subcomponents 具有自己的生命周期,并且当对 subcomponents 的所有引用都消失并且具有相同的 scope 限制时可以进行垃圾收集。使用此方法的一个优点是您无需定义所有下游 components。

另一个主要区别是 subcomponents 只需要在父组件中声明。

以下是 Activity 使用 subcomponent 的示例。我们使用自定义 scope 和 @Subcomponent 注解来注解该类:

1
2
3
4
5
@MyActivityScope
@Subcomponent(modules={ MyActivityModule.class })
public interface MyActivitySubComponent {
void inject(MyActivity activity);
}

将使用的 module 定义如下:

1
2
3
4
5
6
7
8
9
10
11
12
13
14
15
@Module
public class MyActivityModule {
private final MyActivity activity;

// must be instantiated with an activity
public MyActivityModule(MyActivity activity) { this.activity = activity; }

@Provides
@MyActivityScope
@Named("my_list")
public ArrayAdapter providesMyListAdapter() {
return new ArrayAdapter<String>(activity, android.R.layout.my_list);
}
...
}

最后,在父 component 中,我们将定义一个工厂方法,该方法具有 component 的返回值和实例化它所需的依赖项:

1
2
3
4
5
6
7
8
@Singleton
@Component(modules={ ... })
public interface MyApplicationComponent {
// injection targets here

// factory method to instantiate the subcomponent defined here (passing in the module instance)
MyActivitySubComponent newMyActivitySubcomponent(MyActivityModule activityModule);
}

在上面的示例中,每次调用 newMyActivitySubcomponent() 时都会创建子 component 的新实例。要使用子 module 注入Activity:

1
2
3
4
5
6
7
8
9
10
11
public class MyActivity extends Activity {
@Inject ArrayAdapter arrayAdapter;

public void onCreate(Bundle savedInstance) {
// assign singleton instances to fields
// We need to cast to `MyApp` in order to get the right method
((MyApp) getApplication()).getApplicationComponent())
.newMyActivitySubcomponent(new MyActivityModule(this))
.inject(this);
}
}

Subcomponent Builders

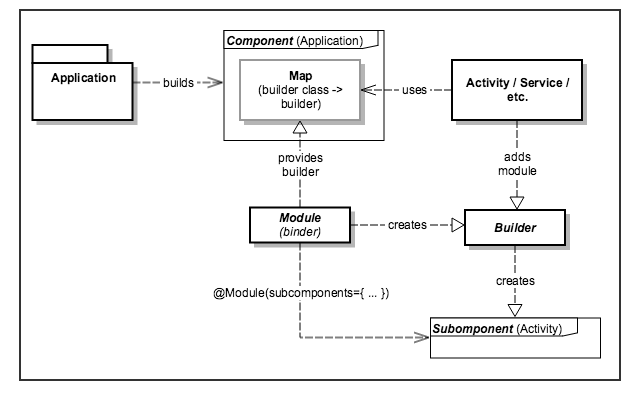
Subcomponent builders

通过消除在该父 component 上声明的子 component 工厂方法的需要,子 component 构建器允许子 component 的创建者与父 component 解耦。

1
2
3
4
5
6
7
8
9
10
11
12
13
@MyActivityScope
@Subcomponent(modules={ MyActivityModule.class })
public interface MyActivitySubComponent {
...
@Subcomponent.Builder
interface Builder extends SubcomponentBuilder<MyActivitySubComponent> {
Builder activityModule(MyActivityModule module);
}
}

public interface SubcomponentBuilder<V> {
V build();
}

Subcomponent 构建器在 Subcomponent 接口中声明为内部接口,并且必须包含与 Subcomponent 匹配的返回类型的build() 方法。使用此方法声明基接口很方便,如上面的 SubcomponentBuilder 。必须使用带有“subcomponents”参数的“binder”模块将此新构建器添加到父组件图中:

1
2
3
4
5
6
7
8
9
10
11
12
13
14
15
16
17
18
@Module(subcomponents={ MyActivitySubComponent.class })
public abstract class ApplicationBinders {
// Provide the builder to be included in a mapping used for creating the builders.
@Binds @IntoMap @SubcomponentKey(MyActivitySubComponent.Builder.class)
public abstract SubcomponentBuilder myActivity(MyActivitySubComponent.Builder impl);
}

@Component(modules={..., ApplicationBinders.class})
public interface ApplicationComponent {
// Returns a map with all the builders mapped by their class.
Map<Class<?>, Provider<SubcomponentBuilder>> subcomponentBuilders();
}

// Needed only to create the above mapping
@MapKey @Target({ElementType.METHOD}) @Retention(RetentionPolicy.RUNTIME)
public @interface SubcomponentKey {
Class<?> value();
}

一旦构建器在 component 图中可用,Activity 就可以使用它来创建其子组件:

1
2
3
4
5
6
7
8
9
10
11
12
13
14
public class MyActivity extends Activity {
@Inject ArrayAdapter arrayAdapter;

public void onCreate(Bundle savedInstance) {
// assign singleton instances to fields
// We need to cast to `MyApp` in order to get the right method
MyActivitySubcomponent.Builder builder = (MyActivitySubcomponent.Builder)
((MyApp) getApplication()).getApplicationComponent())
.subcomponentBuilders()
.get(MyActivitySubcomponent.Builder.class)
.get();
builder.activityModule(new MyActivityModule(this)).build().inject(this);
}
}

ProGuard

Dagger 2 should work out of box without ProGuard, but if you start seeing library class dagger.producers.monitoring.internal.Monitors$1 extends or implements program class javax.inject.Provider, make sure your Gradle configuration uses the annotationProcessordeclaration instead of provided.

Troubleshooting

  • If you are upgrading Dagger 2 versions (i.e. from v2.0 to v2.5), some of the generated code has changed. If you are incorporating Dagger code that was generated with older versions, you may see MemberInjector and actual and former argument lists different in length errors. Make sure to clean the entire project and verify that you have upgraded all versions to use the consistent version of Dagger 2.

References

评论

Your browser is out-of-date!

Update your browser to view this website correctly. Update my browser now

×

keyboard_arrow_up 回到顶端